
Presentation and automation
Dynamic RSI strategy
- A stable, versatile strategy that you can find the official presentation on TradingView here
- Use from TradingView / Opening access by registering on our site
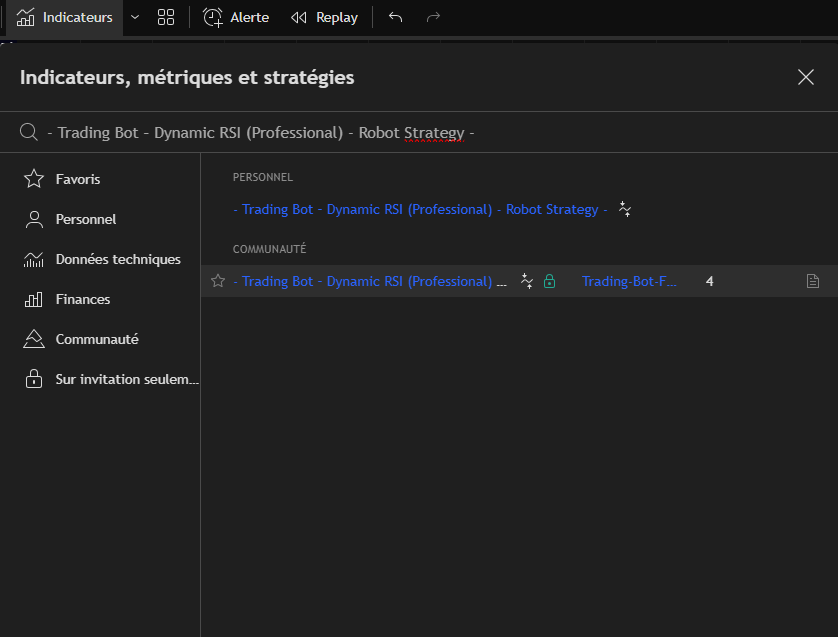
- To load the strategy onto TradingView : Click on indicators then search for - Trading Bot - Dynamic RSI (Professional) - Robot Strategy -
- This strategy does not have automatic backtesting. However, it's easy to learn for experienced traders.
- Set the strategy (The 3 main factors are Filter Smoothing (3 or 4), RSI lenght (9-14) and Take-Profit (1-3.5).
- Record an alert once the strategy has been set with your webhook and message (received after creating an instance) and you have a trading bot.
- One instance = One Bitget trading account = Unlimited number of bots (or only by your Tradingview subscription level)
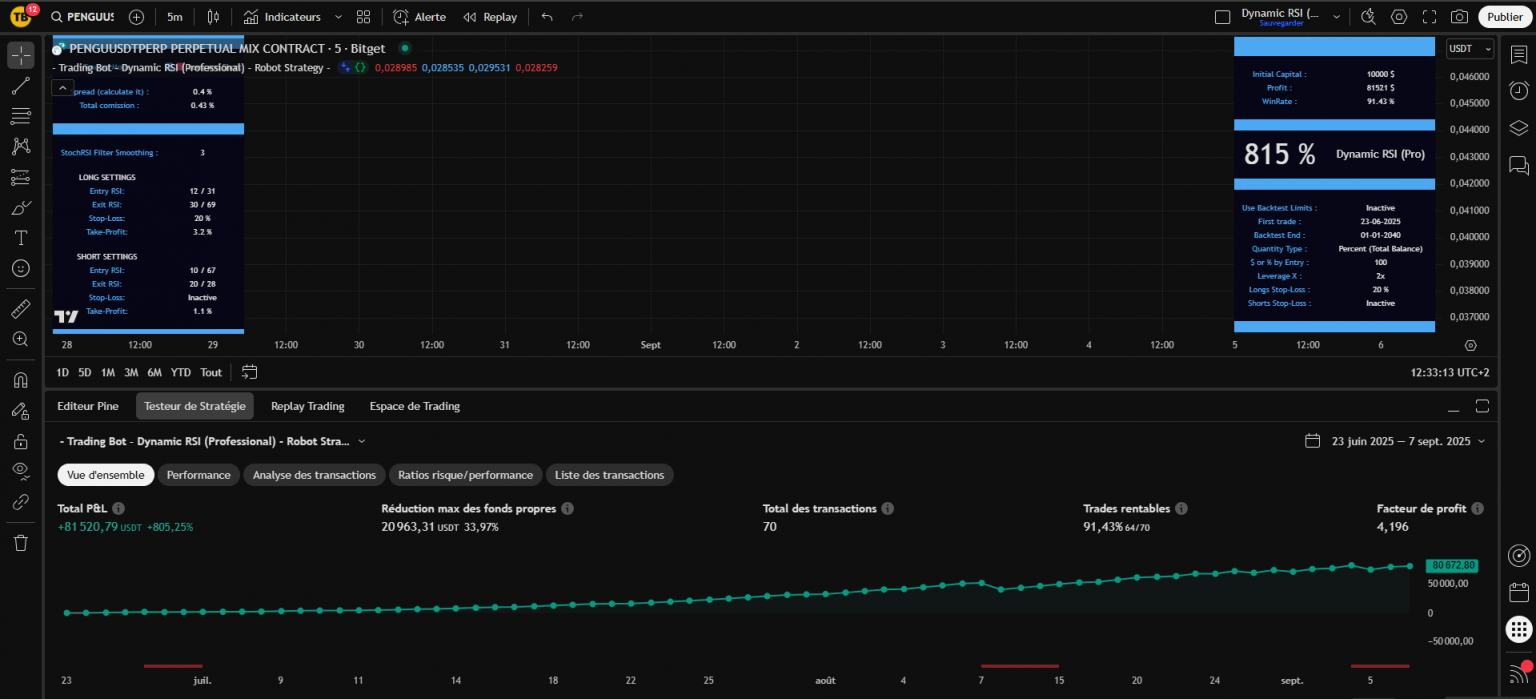
1 - Strategy presentation
Dynamic RSI is our strategy for experienced traders who want to tackle short timeframes, numerous daily trades and scalping.
This is an aggressive strategy that allows a large number of trades and high returns, but requires a good understanding of capital management. We don't offer any suggested settings for this strategy, but it's relatively easy to learn and adjust for experienced TradingView users. It is a good complement to long-term trading with the TopBot Anomaly strategy (in 4 hours, for example).
Its philosophy is based on the search for oversold or overbought movements, with three different confirmation levers. It enters a position when an oversold or overbought threshold is confirmed, making a statistical bet that the market will correct as a result.
Unlike many other strategies, in addition to the three validation conditions for entries, it has two possible exits that work together: a take-profit level and a variable exit level, when an overbought or oversold move in the opposite direction is detected. This dual way of choosing exit points ensures more profitable trades and avoids the simple duel choice between hitting the stop-loss or hitting the take-profit.
Priority will be given to capital management in terms of position size and/or the use of a Stop-Loss
Dynamic RSI is fully compatible with our trading instances and can be programmed in a few clicks from TradingView to monitor the markets and place trading orders for you as soon as the conditions are met.
2 - Using and setting the Dynamic RSI strategy
A - Get access and load the strategy on TradingView
To use the strategy, you must have a Tradingview account and be registered on our site.
Once these two conditions have been met, simply go to a TradingView chart, click on "Indicators" and search for - Trading Bot - Dynamic RSI (Professional) - Robot Strategy -
If your registration on our site has been validated, the padlock will appear in green, and all you have to do is click (once) on the strategy name to load it onto your chart.
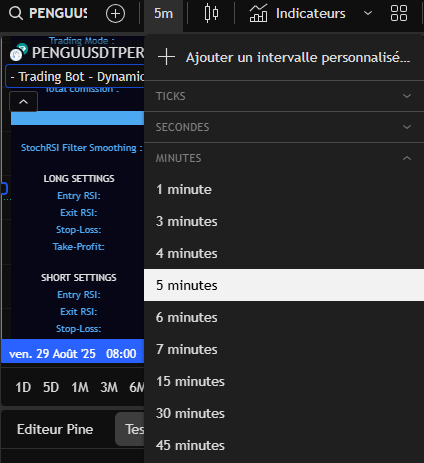
B - Selecting the right TimeFrame and data source
Once the strategy has been loaded onto your chart, you will need to select an asset and a data source. To date, we offer trading instances for automation on Bitget (available in France with a VPN).
Bitget has the advantage of a very large number of cryptocurrencies that can be traded (over 500 in FUTURES), enabling us to multiply our bots on a single trading account. Our backtesters run on Bitget data.
On TradingView, start by selecting a TimeFrame. The strategy works on most of them, although of course you'll need to adapt the settings. You can start by reproducing the settings suggested on the Telegram channel, and together we'll see how to fine-tune them.
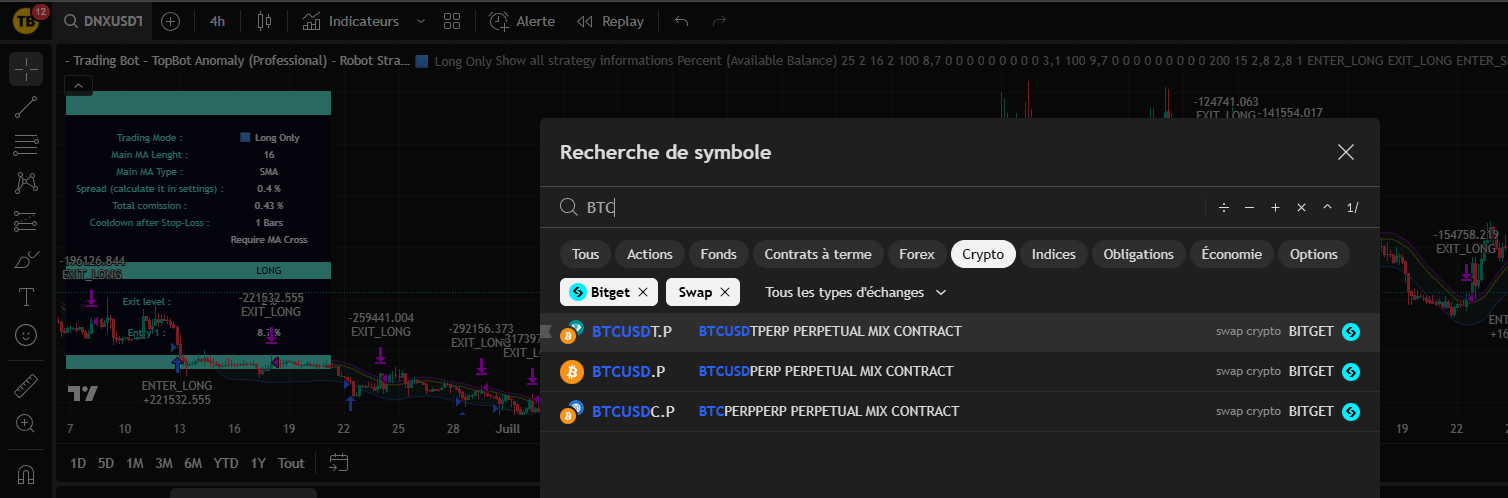
In a second step, we will select an asset and a data source.
For Bitget : Select cryptocurrency pairs by USDT.P (e.g. BTCUSDT.P) in SWAP (see screenshot below) by clicking on the magnifying glass at the top left of your TradingView chart.
You will need USDT in your Bitget FUTURES USDT-M account to trade.
C - Open settings and adjust strategy
The easiest way is to start by retrieving one of the results from the automatic backtests on one of our Telegram channels.
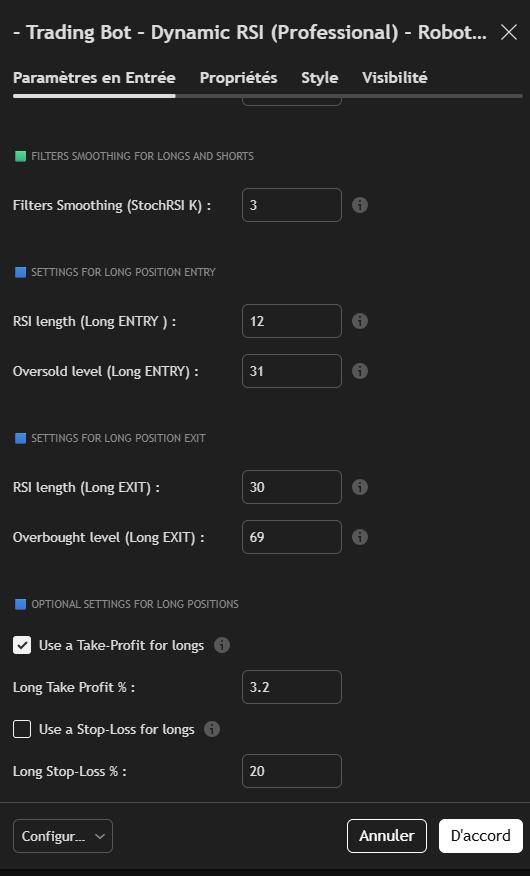
To open the strategy settings, double-click on his name:
Start by programming the strategy by setting :
- Select the Trading mode
- Set the Filter Smoothing (StockRSI K) : Usually 3 or 4
- Set the RSI Lenght (long or short): Generally between 9 and 16
- Set the Oversold level (Overbought for shorts): Generally between 28 and 32 for longs; 65 and 71 for shorts.
- Set the Take-Profit This element can completely change the results of your strategy.
- Adjust the exit conditions RSI Lenght generally between 18 and 32, Overbought / Oversold around default values
The level of Take-Profit is very important to obtain the best results. Once you've found the right level, it's sometimes worth repeating the set-up sequence from the beginning to refine the results.
D - Refine settings
- The level of Take-Profit is very important to obtain the best results. Once you've found the right level, it's sometimes worth repeating the set-up sequence from the beginning to refine the results.
E - Managing capital
You are invited to read all the Tutorials on capital management if you are a beginner in trading..
Programming choices and risk management are your sole responsibility as a trader.
Capital management is probably the most important element in your success.
For this strategy, we recommend manage your capital by managing the size of your positions. It is also possible to manage risk by using Stop-Loss or both.
Here are two reasonable examples for a strategy set with 1 entry in a single position:
In 5 minutes : 1% (conservative) to 4% (aggressive) of total capital with leverage x5 (max). This means that if the price is 20% unfavorable to you after entering a position (rare in 5 minutes, but it can happen), the position (1 to 2% of total capital) is liquidated (loss of entire position).
In 4 hours : Positions are held longer, prices can fluctuate much more. We'll use a maximum x2 lever.
For example, for conservative capital management:
Position size : 2%-4% lever x1 (maximum theoretical risk of 2%, but in reality liquidation is statistically very unlikely)
For aggressive capital management: Position size: 10% lever x1 or 5% lever x2 (max)
You can use multiple entry levels to smooth your trades. Remember then that each entry will be the amount of the parameters chosen in the position size setting section. Take this into account in your capital management, by dividing the size of your position by the number of entries. to maintain a maximum risk equivalent to the one you have chosen for your trading plan.
F - Automate strategy (Create a Bot)
Our strategies include built-in automation capabilities.
You need to have opened an account (free or paying) on WunderTrading to benefit from this system. This service is free if you use the Hyperliquid exchange, and reasonably priced if you use one of the many other exchanges offered by the platform.
With this integration, all you have to do is set up your strategy, create a "signal bot" on WunderTrading, enter messages for your bot in the strategy settings and create an alert on TradingView.
Each alert can then become an autonomous, automated trading bot.
An alert saves all settings, timeframes, assets, etc. that were on the screen when it was created. Once the alert has been created, you can close the strategy or set it differently, but this will have no impact on your bot, which will continue to run with its original settings in the background, placing buy and sell orders when the time comes.
For stop or edit a trading bot, you need to delete the alert and your bot on WunderTrading and create a new one with the new settings.
You will find a complete and detailed tutorial in the " section. Automation "You'll find it on our website.
3 - Additional technical points / FAQ
Here are some optional additional points that will be added to as your questions arise:
- The strategy features a number of additional (optional) settings. Small information bubbles appear next to each important setting.
- Prefer a LONG ONLY alert and a separate SHORT ONLY alert to program your bots.
- Don't program two bots on the same asset and in the same direction (long or short): Your bots will be in conflict.
- We strongly recommend that youuse a sub-account specific to the use of a strategy. To be on the safe side, you'll default the leverage to x1 for all assets ("set by batch" box) and the tading bots will send the leverage used.
- If you delete an alert and a position is open, you have to close it on your exchange because it will never be closed.
- The average time between the triggering of the Tradingview alert and the placing of the order is 8 to 12 seconds, depending on the market. Avoid timeframes that are too short.
- About trading instances
- One instance created on our site = One trading account on Bitget = Unlimited number of bots (or only by your Tradingview subscription level)
- Complete information for creating an instance can be found here
- About Trading-Bot and TradingView subscriptions
- We never run promotions on our site. Our rates are already very low, given the value of the service we provide. The best time to start is always now.
- Ultimately, we recommend the Tradingview Premium subscription. It means no expiry date for alerts and the ability to program 400 bots, while offering more history at a fair price. TradingView discounts 70% twice a year. We advise you to wait for these times, subscribe and cancel the automatic renewal. You'll benefit from the 70% during the next promotion and your remaining days will be accumulated.